I always love seeing where other folks get creative, so today I thought I'd take you on a little tour of my craft room (don't worry, I'll be back tomorrow with another awesome card by the talented Brenda U!). Last spring I moved from a spare bedroom into our den and I have to admit I love having the large space. (Thanks hubby for moving my craft room 4 times since we've lived in this house...LOL!) While it's nothing fancy, it is definitely a happy place. :)
I do most of my creating in this portion of the room. All of my most used tools and paper are kept within arms reach.
I store my most used Distress Inks in a 12 x 12 paper tray from the Mementos store. (thanks Lisa!) These trays are also AWESOME for anyone who has to keep track of specific supplies used on projects. As I work on a card, I add the supplies I use to the tray and then when I'm all done I can document my supply list and quickly put the supplies away. Or if I have multiple projects going on at one time, I can keep everything organized by storing supplies and materials in each tray.

Here's a peek at my countertops and cupboards. We purchased these at Lowes--so handy and very affordable.
I store my Penny Black Mix and Match cardstock by color family in this paper organizer (thanks Dad!)and on top I keep track of paperwork (ugghh, paperwork...) in baskets.

And underneath one counter, between cupboards, are some old card catalog units that a school I taught in was giving away. I soooo wish I had taken more, they are super handy. Within these drawers are extra adhesives, glitters, some older stamps, Stickles, paint daubers, and other inks I use less frequently.
Around the corner is my punch storage. This is actually an old bird cage holder. Perfect for my punches and much quieter than the birds. :)
Next, I have two white cabinets where I store some items for class, my finished cards, misc. supplies, and my Copics. Here's a peek inside.
Because my supplies and I travel to Mementos for class often, my most frequently used items are portable. For example, I store my Copics in this handy craft tote, organized by color family. Inside the tote is a little basket, where I keep Copics that are ready to be refilled.
Speaking of being portable, right next to my desk is this rolling craft tote housing basic stuff like scissors, adhesive, etc. It also holds a lot of my Faber-Castell items which I keep organized in pencil pouches.
Now on the other side of the room, you will find most of my "technical" equipment- here's the photo/light tent .
Around the corner you will find the area where I film my videos. The camera stand actually came with the light tent. It is intended to be attached to the table in front of the light tent, but what I've done here is attach it to this shelf next to my desk. Then, when filming with the camcorder, my hands are directly below the camera.
To the right of the area where I film videos is my die cutting machine and my dies. I store my dies (I keep Spellbinders in the original packaging for storage) in an old planter box. Oh, and if your die cutting machine moves around on your table, mesh shelf liners are perfect to keep it still while you crank it.
Finally, here is how I store my stamps. Like most of the furniture in my room, this table has been repurposed from another room in the house. It was purchased at Ikea and used to be our coffee table, but it works great for stamps now.
My stamps are organized into baskets by categories (Christmas, Floral, Cutesy, Clear, etc.) and then labeled with a tag tied to the the basket with ribbon. The blue baskets on top contain stamps I am using in upcoming classes.
EDITED TO ADD : THIS is the light box/system I purchased. LOVE it! I still edit my photos using GIMP (free program you can download) but I really appreciate the freedom the light box system gives me in taking them the photo any time, day or night. Well, thanks for joining me on this little tour. I hope I haven't bored you to death! :) If you've shared your craft space or organizing tips, I'd love to check it out- just leave me a comment with a link. See you tomorrow with another gorgeous card by Brenda!
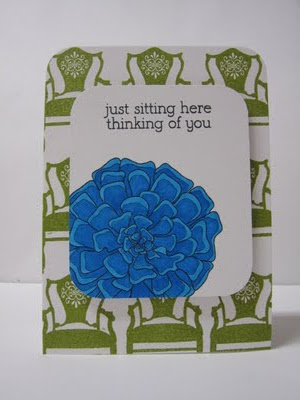
Oh, and I've got a few new cards on the Mementos blog today- here's a peek: